Showing posts with label marble nail polish. Show all posts

Tuesday, August 28, 2012

Crazy about nails!

There are so many adorable designs for fingernails out there right now.  I confess I used to have my nails professionally done every two weeks.  It just got to be so expensive!  I have been cruising the net to find some really great ideas that I can work with at home.   Here are a few of them:

First, from my favorite Rockabilly Chick out there: Miss K
This Leopard look is amazing and relatively easy to do!
How totally cute is this!

This next one is amazing too! This one uses one of my favorite brands of nail polish. Lime Crime!  There is a link to them over there---------------------------------------------------------->


 These are so cute!   I love using Lime Crime polishes, they wear a really long time. 

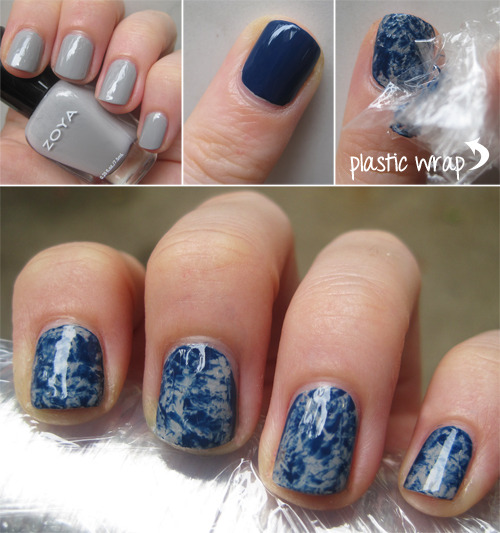
Finally, here is one I found that my daughter Abi does quite a bit.  It looks messy to do but once you finish it the look is awesome!

Enjoy!  I'd love to see some of your favorites!

~Sharon


Monday, July 23, 2012

Reposted blog from Birchbox


 Let me be clear:  This is a repost from Birchbox Blog.

I thought it was great and wanted to share it here.  I didn't write it and do not claim it as mine.  Please be sure to check our their blog!


Get Marble Nails with Plastic Wrap: Mani Monday

As much as we love nail art, we’re better at admiring designs than coming up with them ourselves. That’s why we’ve enlisted Anna Norman, the smarty pants behind Glitter, She Wrote, to be a regular contributor. Every Monday, she’ll be sharing her latest lacquer inspiration—you won’t be satisfied with plain ol’ polish again.

Do you want fool-proof marble nails in just a few minutes? Get thee to the kitchen, because that roll of plastic wrap is about to become your new best friend. This mani is hard to mess up, and you probably have everything you need on hand so you can try it today!
What you’ll need:
-Two nail polishes. Try experimenting with similar shades, contrasting colors, or different finishes to see which look you like best. I’m using light grey Zoya Dove with a dark blue polish, China Glaze First Mate, on top.
-A glossy top coat. I’m using Sally Hansen Hard as Nails.
-Plastic wrap—the roll in your kitchen will be just fine! Cut 10 small pieces (one for each nail), and don’t worry if it crumples or sticks together. That’s the whole idea here.

Step 1: Paint your nails with your base color (in my case, the light grey). Make sure to let the polish dry completely before moving on.
Step 2: Working with one nail at a time, apply a coat of the second polish over one nail. Grab a piece of plastic wrap and move on to Step 3 while the polish is still wet.
Step 3: Immediately blot the top of your nail once or twice with a crumpled piece of plastic wrap. When the sticky wrap touches the wet polish, it will pull up a bit of the color, creating a marbled effect with the base color underneath. If you pull up too much of the wet polish, just add a little more color and dab at it with plastic wrap again. Continue until you’ve completed each nail.
Step 4: If you end up with some polish smudges outside the lines, dip a Q-tip or a small brush in nail polish remover to clean up around the edges. The surface of your nails may be a bit bumpy, so finish your marbled mani with one or two layers of top coat to achieve a smooth and shiny surface.
I love the amazing results you can get from such a simple technique—no steady hands or artistic skills required for this nail art look. Have fun!
We love super smart and easy nail art. Find even more of Anna Norman’s mani magic here.